-
Industries
Explore by Industry
Explore professional custom printing and packaging solutions tailored for every business sector.
 Apparel & Fashion
 Automotive
 CBD & Hemp
 Electronics & E-Com
 Confectionery
 Cosmetics
 Events & Holidays
 Food & Beverages
 Health & Pharma
 Household
 Office & Workplace
 Retail & Outdoor
 Pets
Pets
 Promotional
Shipping
Tobacco & Vape
Toys & Games
Promotional
Shipping
Tobacco & Vape
Toys & Games
Tailored Branding
Premium customized boxes built for your specific product needs.
-
Card Stock
Premium Packaging Materials
Explore professional-grade materials tailored for durability and brand presentation.
Tailored Branding
Premium customized boxes built for your specific product needs.
-
Popular Shapes
Popular Shapes
Explore our best-selling custom packaging shapes that empower brands to stand out and thrive in the modern retail world.
- Services
- Accessories
- Blog
-
Mon-Fri (8am to 6pm)
1-888-840-2012 - Get Quote

Artwork Guidelines
Artwork Preparation Guide for CustomPrintline
To ensure your packaging and printed materials come out exactly as intended, it’s important to prepare your artwork correctly. Following these guidelines will help avoid delays, unexpected results, or additional costs.
✅ Print-Ready File Checklist
Before submitting your artwork, make sure you’ve checked for:
- Correct File Resolution (300 DPI)
- Colors converted from RGB to CMYK
- Proper Bleed, Cutlines, and Safety Margins
- Well-aligned Borders (if used)
- Correct File Format (PDF, AI, PSD, EPS, or High-Res TIFF/JPG)
🎯 1. File Resolution
What it means:
Resolution (DPI/PPI) is the number of dots or pixels within one inch of your artwork. Higher resolution = sharper print quality.
- Always set your artwork to 300 DPI.
- Lower resolutions (72 DPI or 150 DPI) may look fine on screen but will print blurry or pixelated.
How to check in Photoshop:
- Open your file.
- Go to Image > Image Size.
- Ensure the resolution is set to 300 DPI.
🎨 2. Color Mode (RGB vs. CMYK)
What it means:
- RGB (Red, Green, Blue) is for screens (digital).
- CMYK (Cyan, Magenta, Yellow, Black) is for printing.
Since printing presses use CMYK inks, your file must be in CMYK color mode to match final print colors.
Tip: Colors may appear slightly different when converted from RGB to CMYK due to the narrower color range of printing inks. Always design or convert your files in CMYK for accuracy.
✂️ 3. Bleed, Cutline & Safety Margins
- Bleed: Extend your background colors, patterns, or images at least 0.125” (3mm) beyond the trim line to avoid white edges after cutting.
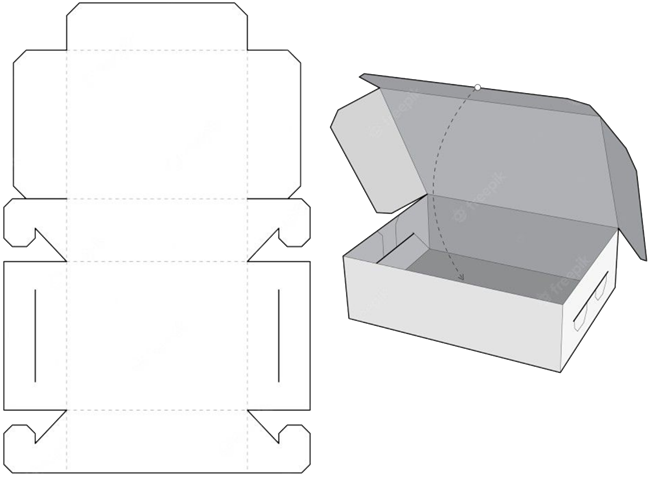
- Cutline (Trim Line): This shows where the box or print will be cut.
- Safety Margin: Keep text, logos, or critical elements at least 0.125” (3mm) inside the trim line to prevent them from being trimmed off.
Example:
If your box panel is 4” x 6”:
- Final artwork size (with bleed) = 4.25” x 6.25”
- Safe area for text/images = 3.75” x 5.75”
⬜ 4. Borders
If you include borders in your design:
- Keep them at least 0.25” (6mm) thick.
- Ensure they are well inside the trim line.
Thin borders close to the edge may appear uneven after trimming.
📂 5. File Formats
We accept the following print-ready file formats:
- PDF (preferred) – Fonts embedded, layers preserved.
- AI or EPS – Vector files with outlined fonts.
- PSD or TIFF – High-resolution (300 DPI).
- JPG – Only if high-resolution (300 DPI).
Tip: Always flatten transparency and embed fonts before submitting.
✨ 6. Special Printing Effects (Optional)
If you’re using premium finishes like embossing, foil stamping, or spot UV:
- Provide an extra layer in your file to indicate where the effect should be applied.
- Use 100% black (K:100) on a separate layer labeled "Foil," "UV," or "Emboss."
- Keep these layers vector-based for best results.
📌 Final Checklist Before Uploading
✔ File is 300 DPI
✔ Colors converted to CMYK
✔ Bleed, cutline, and safety margins included
✔ Fonts outlined or embedded
✔ File format is PDF, AI, EPS, PSD, or High-Res TIFF/JPG
✔ Special effects clearly marked on separate layers
✅ Following these artwork guidelines will help CustomPrintline deliver packaging that looks professional, precise, and exactly as you envisioned.